Integrating MarfeelPass in your site is a hassle free process that takes a few minutes:
- Upload Marfeel’s ApplePay merchant file to allow Marfeel process payments on your domains.
- Connect your Stripe account to Marfeel to authorize payments on your domains.
- Choose a MarfeelPass Experience according to your needs:
- Create a no-code MarfeelPass experience for your web version. Start easy and frictionless simply adding a MarfeelPass button on your existing CMP notice popup without the need of development resources.
- Create a MarfeelPass Notice CMP experience for your web version. To prevent visual flickers and have a complete user experience disable your CMP’s notice popup so MarfeelPass becomes the UI to your CMP.
- Enable the MarfeelPass Notice CMP experience in AMP. Once the MarfeelPass CMP notice popup is setup on the web version you can enable it on your AMP pages seamlessly.
- Review your site configuration to follow our best practices
1. Upload Apple Pay merchant file
Apple Pay Merchant is a service that allows businesses and developers to accept payments within their apps and websites using Apple Pay. To authorize Apple Pay payments, the MerchantId associated with the Marfeel Developer needs to be uploaded to a specific server location. This process ensures the proper configuration for accepting Apple Pay transactions and enables a seamless payment experience for users.
Upload the Marfeel MerchantId file apple-developer-merchantid-domain-association (8.9 KB) to this server location
domain.com/.well-known/apple-developer-merchantid-domain-association
Don’t change any part of the location. Upload it to the root of your domain indicated as domain.com in the example above.
2. Connect your Stripe account to Marfeel
MarfeelPass seamlessly directs user payments to your connected Stripe Account , ensuring complete visibility and a straightforward transaction management process.
To connect your Stripe account to MarfeelPass you can follow our onboarding
3. Choose a MarfeelPass Experience
3.1. Create a Marfeel CMP No Code experience
For quick experimentation and testing, MarfeelPass provides a no-code configuration mode. This mode operates by manipulating the Didomi notice HTML in the DOM, adding or removing action buttons as needed. Keep in mind that using the no-code layout might cause visual flickers and could break if there are changes to Didomi notice CSS selectors.
Follow the steps below to create a no-code Marfeel Experience:
- Go to Experience Manager
- Click on
Create Experience - Choose
MarfeelPassfrom the popup’s side bar - Create a
MarfeelPass CMP No Codeexperience
In the Content tab of the experience you’ll be able to set up:
- Amount to charge users to reject consent
- Reject button text
- If rejection payment should be shared across subdomains or not
3.2. Create a MarfeelPass CMP Notice Experience
Once you’ve easily tested MarfeelPass via no code it’s strongly recommended that you replace your CMP notice popup with a MarfeelPass notice. Doing so will:
- Allow MarfeelPass to show itself anytime users change the CMP configuration and completely or selectively reject a Purpose.
- Prevent visual flickers when adding the MarfeelPass button in the DOM
MarfeelPass only replaces the UI notice from your CMP. MarfeelPass delegates on the underlying CMP the consent management using generic TCF or vendor specific APIs.
Follow these steps below to create a MarfeelPass CMP Notice Experience:
- Go to Experience Manager
- Click on
Create Experience - Choose
MarfeelPassfrom the popup’s side bar - Create a
MarfeelPass CMP Noticeexperience
3.2.1. Choose a Layout
Once created choose one of the two out-of-the-box responsive layouts MarfeelPass offers:
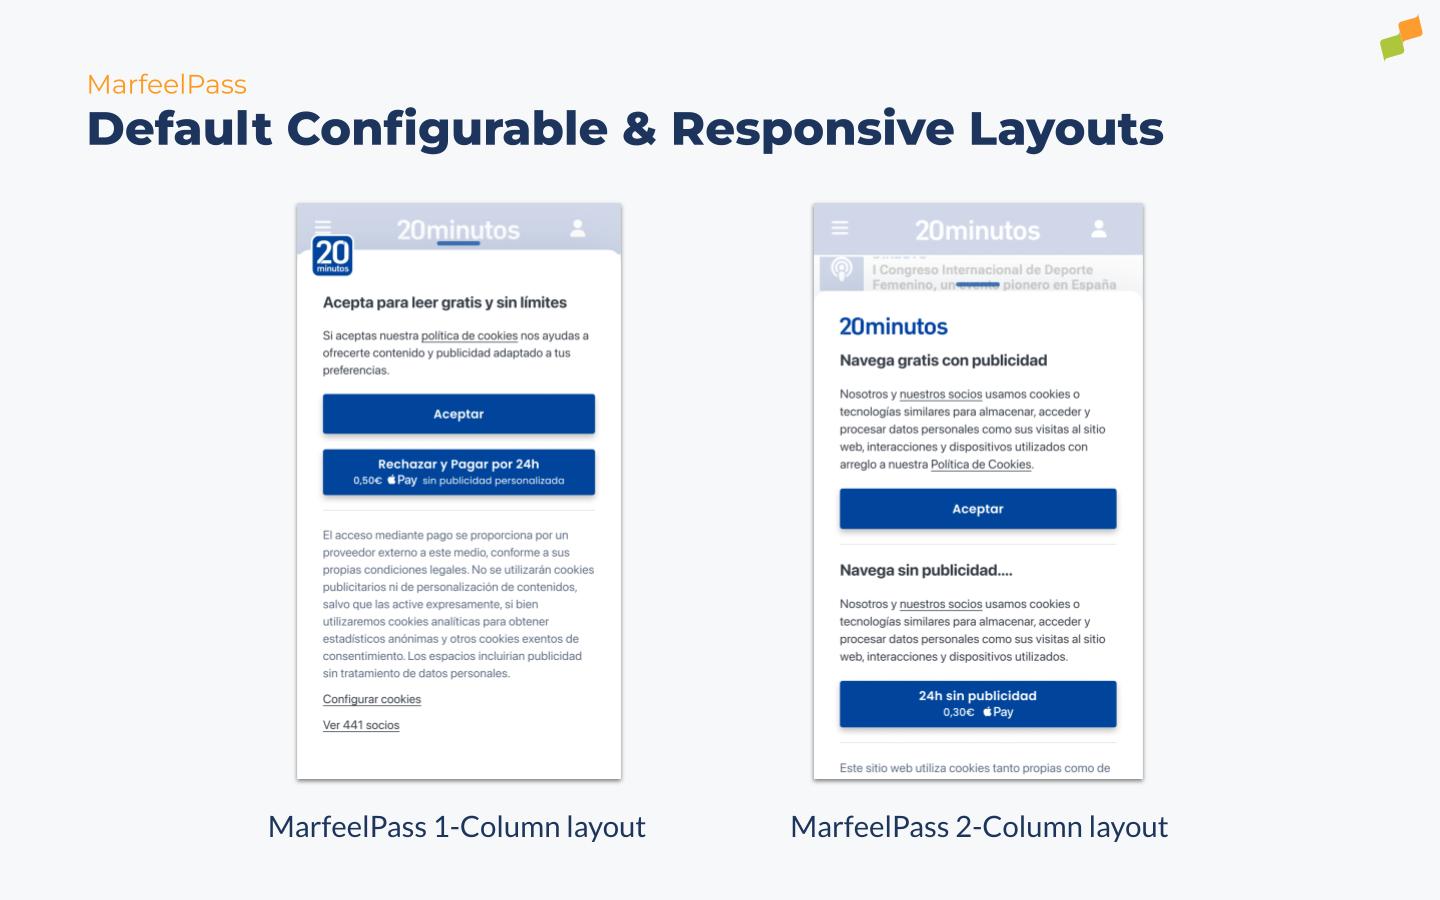

Customize all texts and call-to-actions according to your preferences and specific legal needs in your country. Choose between a favicon style or the full brand logo, and even create a custom layout.
MarfeelPass experience parameters
- Layout: choose the layout that better fits your strategy
- Country
- Currency: The currency of the payment. Valid currencies are
EURorUSD - Amount: the price to charge users for 24h. Use a
.to specify cents. Valid prices are50or0.50 - Share payment across subdomains: Configures if rejection payment should be shared across subdomains or not
Visual Configuration
Use generic Experiences styles’:
- Primary color: To change the color of the call-to-actions
- Icon: To add an icon or the full brand logo
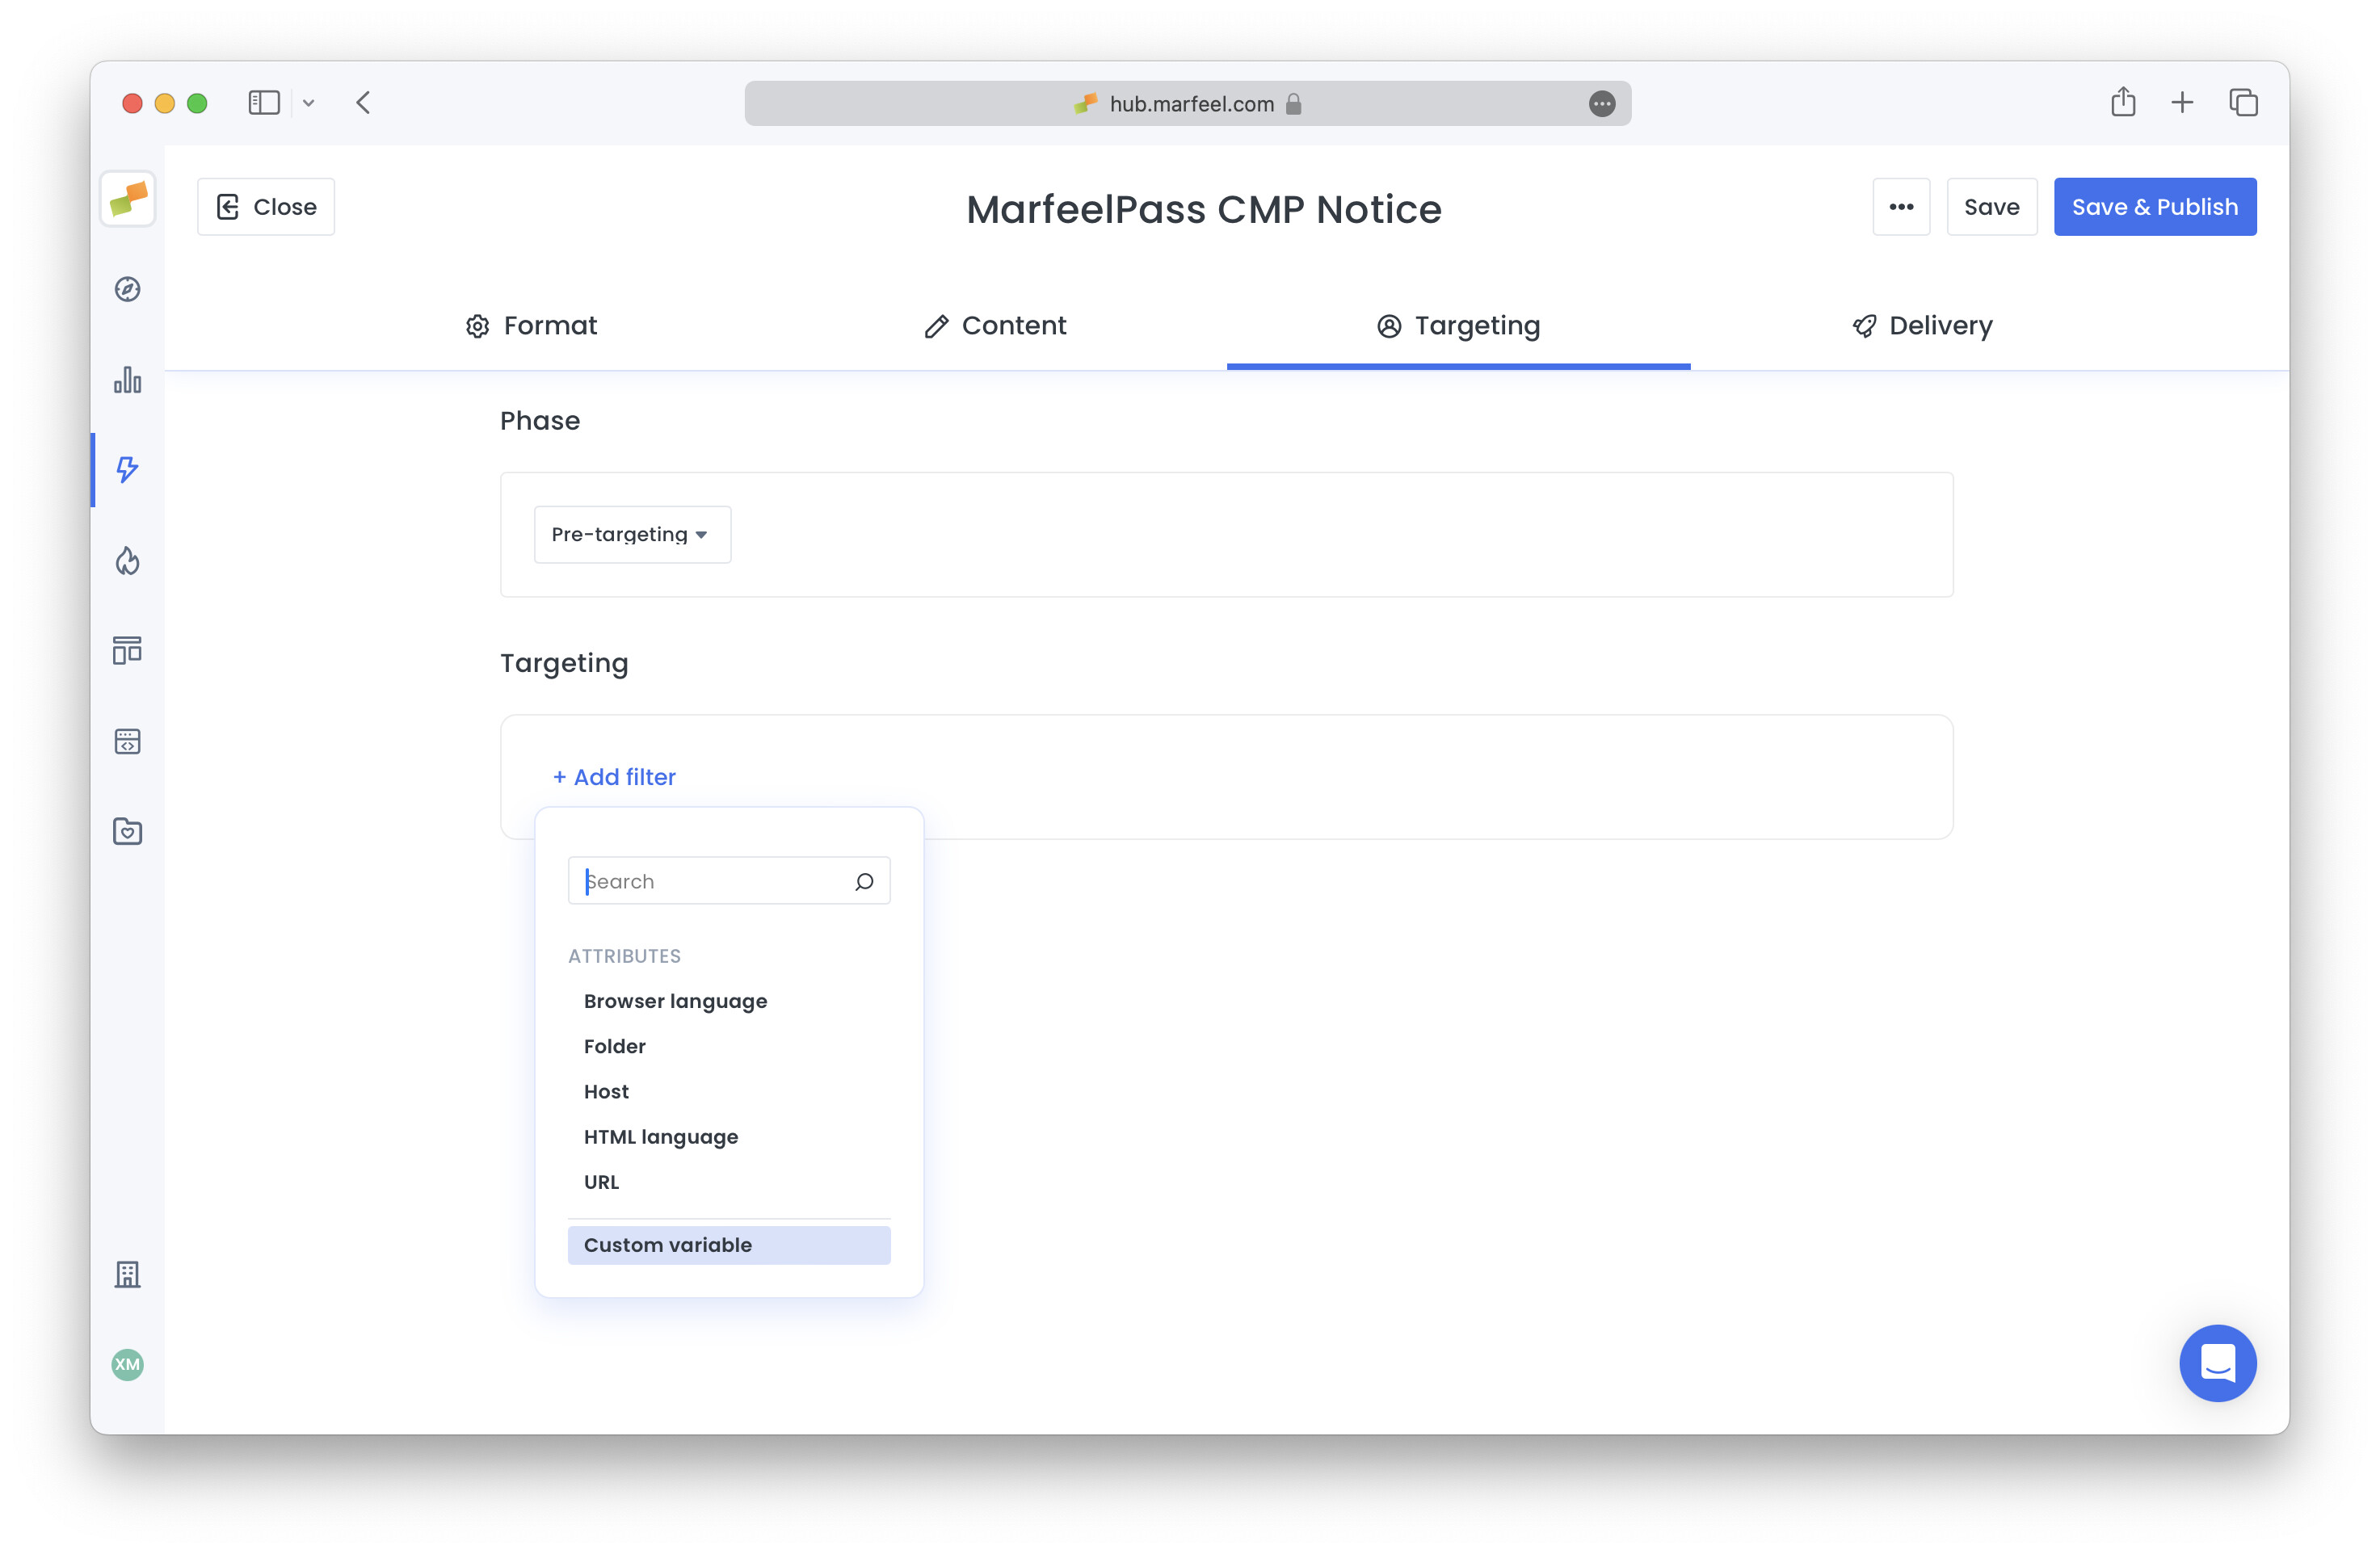
Targeting
You can have different MarfeelPass experiences impacting different users depending on some conditions. As the experience needs to use Pre-Targeting phase, dimensions available are limited to the following:
- Host
- Folder
- URL
- HTML Language
- Browser Language
- Experiment Groups - select “Custom Variable” and enter the name of the experiment group, which you need to have previously configured in Experiences Settings.
3.2.2. Configure MarfeelPass as your CMP notice
Didomi integration
Disable Didomi notice by default. This will prevent showing Didomi’s consent layer so MarfeelPass layer can show.
The code below must be added above Didomi’s initialization code:
<script type="text/javascript">
   if (!window.didomiConfig) {
      window.didomiConfig = {};
   }
   if (!window.didomiConfig.notice) {
      window.didomiConfig.notice = {};
   }
   if (!window.didomiConfig.app) {
     window.didomiConfig.app = {};
   }

   // time in seconds pay to reject should be valid. In this example, one day in seconds is 24h * 60min * 60s = 86400.
   window.didomiConfig.app.deniedConsentDuration = 86400;
   window.didomiConfig.notice.enable = false;
</script>
Connector Details
MarfeelPass relies the following Didomi specific methods:
- MarfeelPass CMP notice will show when TCF API notifies there’s no valid consent string
- Accept all:
Didomi.setUserAgreeToAll() - Reject when payment successful:
Didomi.setUserDisagreeToAll(); - List of partners:
Didomi.getRequiredVendors() - Open vendors list:
Didomi.preferences.show('vendors')
3.3. Configuring AMP
Following the same strategy for the Web integration the MarfeelPass notice is displayed to the users instead of using Didomi’s default one.
<amp-consent id="consent" layout="nodisplay" type="didomi">
  <script type="application/json">
   {
      "promptUISrc": "https://experiences.mrf.io/passexperience/render?id={{EXPERIENCE_ID}}&type=amp&canonical_url=CANONICAL_URL",
      "sandbox": "allow-top-navigation-by-user-activation allow-popups-to-escape-sandbox",
      "uiConfig": { "overlay": true },
      "clientConfig": {
         "config": {
            "notice": {
               "initialHeight": "70vh"
             },
             "app": {
                "apiKey": "XXX" //Your API key
             }
         }
         //... Any other custom clientConfig you might have
      }
    }
  </script>
</amp-consent>
You can check how your experience will look by clicking on promptUISrc from Experience Manager:
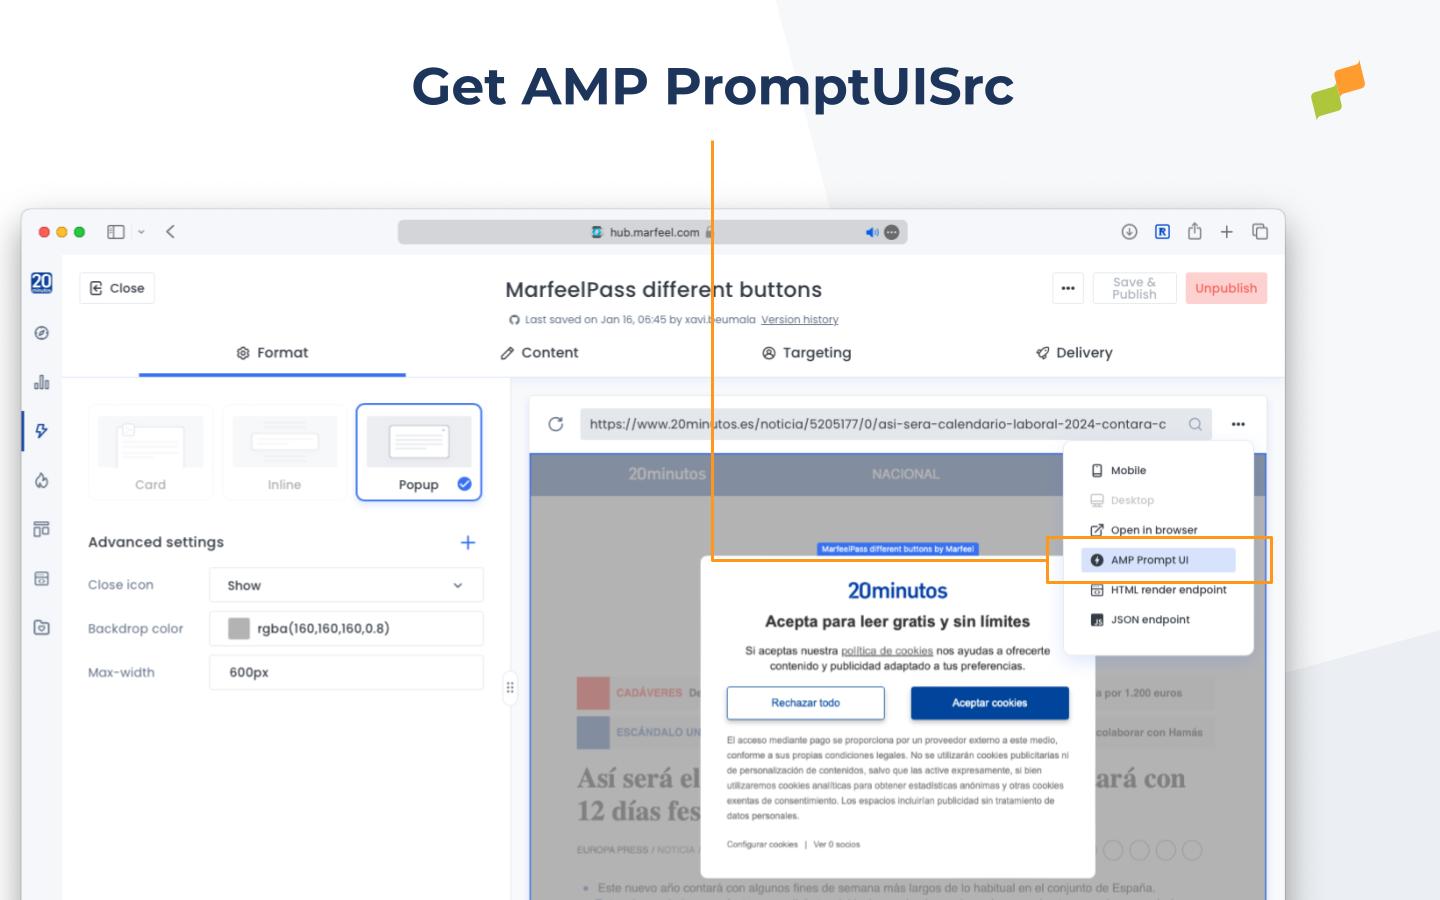
Note that the promptUISrc property has canonical_url=CANONICAL_URL. You can add or remove this parameter in order to enable or disable the redirections to the canonical when payment mechanisms are not available. If the canonical_url param is not provided MarfeelPass will fallback to a simple Reject All option.
In order to properly track CMP metrics and private sessions on AMP please make sure to use AMP tracker v.2.0.
4. Review your site configuration
1. Ensure Marfeel SDK Priority
- To execute MarfeelPass before other elements that need consent, make sure the Marfeel SDK is present in your HTML or is given priority within your GTM (Google Tag Manager) configuration.
- iOS and Safari 17 natively blacklists Google Tag Manager and Google Ads in private sessions. If you load the Marfeel SDK via GTM, MarfeelPass won’t show.
2. Disable Interaction-Blocking JavaScript Code
- Check for any JavaScript code on your site that creates an interaction-blocking layer. It is essential to disable such code, as MarfeelPass manages this functionality directly.