Marfeel Writer is a writing tool. It works as simply as any word processor, but with native built-in Marfeel Copilot’s assistance, ensuring a seamless journey in crafting engaging stories.
You can start working on a new document by clicking ‘New’ from the documents manager.
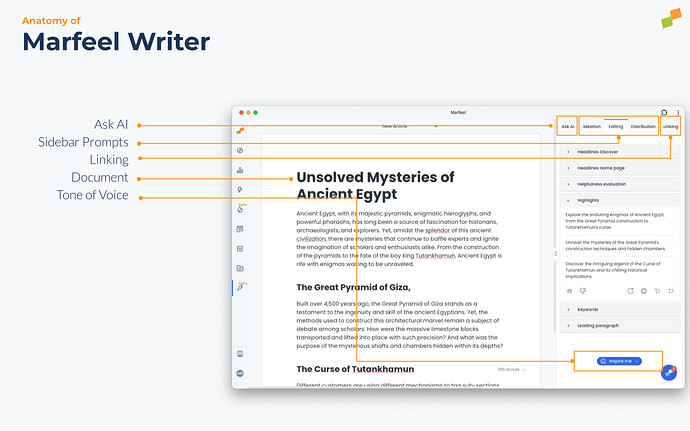
The Marfeel Writer UI consists of these primary elements:
- Document : This central area is where users can create and edit their documents effectively.
- Sidebar AI Suggestions : Offers quick access to different Marfeel Copilot+ Suggestions and tools for seamless document editing and writing.
- Linking: Lists relevant articles to potentially include as hyperlinks within your narrative.
- Ask AI : Within this feature, users can execute Custom AI Questions based on contextual needs to enhance their document creation experience. All prompts responses are saved in chat format at document level.
- Selection Bar : Users can select any text within the document and easily format the text, access Custom AI Questions or find relevant linking opportunities
- Tone of Voice: Dropdown to select the tone of voice that Marfeel Copilot will use to assist you crafting your stories.
Ask AI
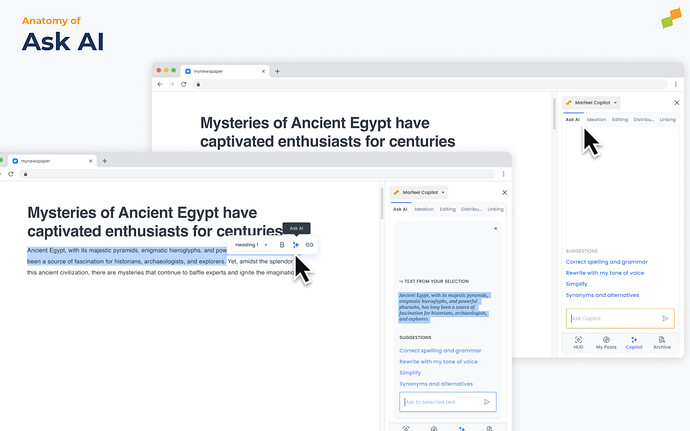
Ask AI is a user interface feature tailored to aid users in performing Marfeel Copilot+ AI Queries and effortlessly integrating new content blocks into their document. It operates in a chat-style format to facilitate the monitoring of all user actions.
Ask AI can be accessed through various methods:
- Selecting any text through either mouse clicks or keyboard shortcuts and pressing
ESC. - Pressing the
ESCkey within an empty block. - Pressing the
ESCkey selects a text block, opens and focuses the Ask AI module. - Clicking on the Marfeel Copilot+ icon located on the left margin of the document or in the Selection Bar.
- Clicking on “Ask AI” at any given moment within the Sidebar AI Suggestions.
You can type any question to the LLM or you can press cmd/ctrl + K with a text selection active to see linking options.
Style your writing
Marfeel Writer is equipped with all the text styling features you’ve come to expect from any word processor - with a few extras added in. Formatting can be added in one of these three flavors:
- Keyboard shortcuts. Of course, all the usual shortcuts apply.
- Markdown shortcuts for quick formatting.
- Highlight any text and open the formatting options on the Selection Bar.
Here’s a summary table of the supported shortcuts:
| Style Shortcuts | Markdown | Keyboard |
|---|---|---|
| Bold | **Bold** |
cmd/ctrl + B |
| Italic | *Italic* |
cmd/ctrl + I |
| Underline | _underline_ |
cmd/ctrl + U |
| Inline code | ` | - |
~Strikethrough~ |
cmd/ctrl + shift + S |
|
| Highlight | ^^Highlight^^ |
cmd/ctrl + shift + H |
| Bullet list | * |
- |
| Numbered list | 1. |
- |
| To-Do checkbox | [] |
- |
| Normal text | - | ctrl + 0 |
| H1 | # |
ctrl + 1 |
| H2 | ## |
ctrl + 2 |
| H3 | ### |
ctrl + 3 |
| Select block | - | ESC |
| Move block up / down | - | cmd/ctrl+ shift + arrow keys |
Markdown style
Markdown style allows you to format text using simple symbols and characters, making it easier to structure and style your writing without needing to know complicated code. While typing:
- Type
**on either side of your text to bold. - Type
*on either side of your text to italicize . - Type
_on either side of your text to underline. - Type ` on either side of your text to create
inline code. - Type
~on either side of your text to strikethrough. - Type
^^on either side of your text to highlight
At the beginning of any new line or existing block of content, try these:
- Type
*,-, or+followed byspaceto create a bulleted list. - Type
[]to create a to-do checkbox, followed byspace. (There’s nospacein between.) - Type
1.,a., ori.followed byspaceto create a numbered list. - Type
#followed byspaceto create an H1 heading. - Type
##followed byspaceto create an H2 sub-heading. - Type
###followed byspaceto create an H3 - Type
>followed byspaceto create a toggle list. - Type
"followed byspaceto create a quote block. - Type
---followed byspaceto create a divider. (Three dashes in a row.)
Keyboard shortcuts
Of course, all the usual shortcuts apply:
- With text selected, press
cmd/ctrl+Bto bold text . - With text selected, press
cmd/ctrl+Ito italicize text . - With text selected, press
cmd/ctrl+Uto underline text. - With text selected, press
cmd/ctrl+shift+Sfor strikethrough. - Press
cmd/ctrl+shift+Hto apply the last text or highlight color you used. - With text selected, press
cmd/ctrl+Kto add a link. You can also paste a URL over selected text to turn it into a link usingcmd/ctrl+V.
For all of these content creation shortcuts, cmd + option is the combination for Mac, and ctrl + shift is the combination for Windows and Linux:
- Press
cmd/ctrl+option/shift+0to create text. - Press
cmd/ctrl+option/shift+1to create an H1 heading. - Press
cmd/ctrl+option/shift+2to create an H2 heading. - Press
cmd/ctrl+option/shift+3to create an H3 heading.
Edit & move blocks
- Press
ESCto select the block you’re currently in. Or to toggle Ask AI visibility. - Hold
cmd/ctrl+shift+arrow keysto move a selected block around.

